
Weekoding
[Swift] Apple Login 구현하기 [2/3] - Apple로 Login 구현하기 본문
[Swift] Apple Login 구현하기 [1/3] - 기본 개념
이번에 "Sign in with Apple"를 구현할 일이 있었는데, 생각보다 애를 먹었다. 정확히는 revoke token부분이 Login with Kakao ID와는 다르게 엄~청 어려웠다. 다음번엔 좀 더 능숙하게 구현하기 위해 한번 정리
weekoding.tistory.com
지난 포스팅에서는 개념을 짚어보았고, 이번에는 직접 로그인을 구현해 볼 것이다.
📂 Creating ViewControllers
이번에는 Storyboard를 사용하지 않고, SnapKit을 사용하여 Code-base UI를 단순하게 짜 보았다.
만들기 전에, 애플 로그인 버튼 디자인 관련하여 아래 링크로 들어가 한번 읽어보는 것을 추천한다.
https://developer.apple.com/design/human-interface-guidelines/technologies/sign-in-with-apple
Introduction - Technologies - Human Interface Guidelines - Design - Apple Developer
Sign in with Apple Sign in with Apple provides a fast, private way to sign into apps and websites, giving people a consistent experience they can trust and the convenience of not having to remember multiple accounts and passwords. Supporting Sign in with A
developer.apple.com


LoginViewController의 UI Code는 다음과 같다.
class LoginViewController: UIViewController{

  let logoImageView = UIImageView()
  let welcomeLabel = UILabel()
  let loginButton = UIButton()

    override func viewDidLoad(){
        super.viewDidLoad()
        self.view.backgroundColor = .white

        self.setViews()
        self.makeViews()
    }

    private func makeViews(){
        self.logoImageView.image = UIImage(systemName: "applelogo")
        self.logoImageView.tintColor = .systemGray
        self.logoImageView.contentMode = .scaleAspectFit

        self.welcomeLabel.numberOfLines = 0
        self.welcomeLabel.textAlignment = .center
        self.welcomeLabel.font = .systemFont(ofSize: 20, weight: .semibold)
        self.welcomeLabel.text = "Welcome! Sign With Apple to enjoy our Service"
        self.welcomeLabel.textColor = .label

        self.loginButton.layer.cornerRadius = 25
        self.loginButton.backgroundColor = .white
        self.loginButton.setImage(UIImage(systemName: "applelogo"), for: .normal)
        self.loginButton.setTitle("  Sign in with Apple", for: .normal)
        self.loginButton.setTitleColor(.label, for: .normal)
        self.loginButton.titleLabel?.font = .systemFont(ofSize: 17.0)
        self.loginButton.imageView?.tintColor = .black
        self.loginButton.layer.borderWidth = 0.5
        self.loginButton.addTarget(self, action: #selector(tappedAppleLoginBtn), for: .touchUpInside)

    }

    private func setViews(){
        [logoImageView, welcomeLabel, loginButton].forEach({view.addSubview($0)})

        self.logoImageView.snp.makeConstraints({
            $0.width.equalTo(50)
            $0.height.equalTo(50)
            $0.centerX.equalToSuperview()
            $0.centerY.equalToSuperview().multipliedBy(0.80)
        })

        self.welcomeLabel.snp.makeConstraints({
            $0.leading.trailing.equalToSuperview().inset(30)
            $0.top.equalTo(self.logoImageView.snp.bottom).offset(20)
        })

        self.loginButton.snp.makeConstraints({
            $0.leading.trailing.equalToSuperview().inset(50)
            $0.top.equalTo(self.welcomeLabel.snp.bottom).offset(60)
            $0.height.equalTo(50)
        })
    }
}
📂 Attaching Capability, Registering Identifiers
Sign in with Apple의 구현 방법은 타 기업(Kakao, Naver, Facebook 등)의 방법과는 조금 다르다.

먼저, Targets → Signing & Capabilities에서 "+ Capability" 버튼을 눌러준다.
목록에 Sign in with Apple이라는 옵션이 있을것이다. 이를 선택해준다.
⚠️ Notice :
Signing&Capabilities → Signing에서 Team(계정)이 Apple Developer Program에 결제가 되어있는 상태가 아니라면,
Sign in with Apple 항목을 찾을 수 없을 것이다.

좀 더 복잡한 절차가 남아있다.

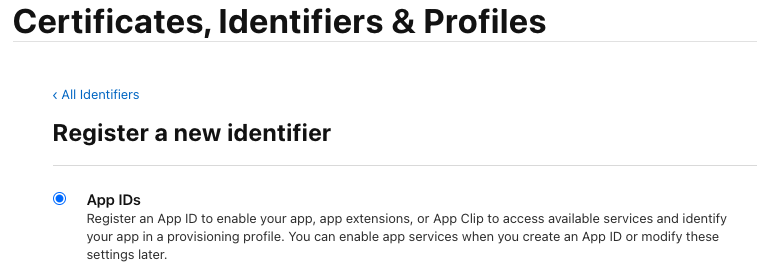
Apple Developer 사이트의 Account 항목에서, Identifiers를 누르게 되면 위와 같은 페이지로 이동할 수 있다.
동그란 + 버튼을 눌러서 Identifiers를 추가해주어야 한다.
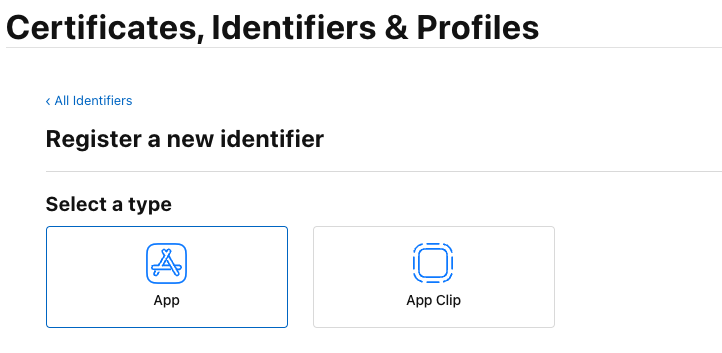
계속 다음을 누르면 된다.

Description: 특수문자를 사용할 수 없고, 말 그대로 Identifier에 대한 간략한 설명이다.
Bundle ID: App의 TARGETS → Signing & Capabilities에서도 확인 할 수 있는데, 변경 가능한 값이다.
⚠️ Notice :
"An attribute in the provided entity has invalid value" 에러가 등장하면서 진행되지 않을 때가 있다.
개발자 계정에 식별자를 등록할 때 Bundle ID 앞에 팀 ID(Apple에서 생성된)를 포함하지 않아서 발생한 것.
Bundle ID 앞에 Team ID를 넣어주면 된다.

이후 오른쪽 상단의 continue 버튼을 눌러 등록이 완료되면 사전준비가 모두 끝나게 된다.
📂 import AuthenticationServices
이제 진~짜 코드로 구현하는 부분!
먼저 import를 해주어야 한다.
import AuthenticationServices
Apple로 로그인을 시작할 메소드(버튼을 눌렀을 때 호출할 메소드)에 아래 코드를 넣어준다.
 let appleIDProvider = ASAuthorizationAppleIDProvider()
 let request = appleIDProvider.createRequest()
 request.requestedScopes = [.fullName, .email] //유저로 부터 알 수 있는 정보들(name, email)

 let authorizationController = ASAuthorizationController(authorizationRequests: [request])
 authorizationController.delegate = self
 authorizationController.presentationContextProvider = self
 authorizationController.performRequests()
request를 통해 받아올 수 있는 정보는 fullName과 email로 한정된다.
키워드는 ASAuthorizationController와, delegate / presentationContextProvider.
🗝 ASAuthorizationController
로그인을 하기 위한 flow에서 ASAuthorizationController가 제공된다.
performRequests()를 통해 요청할 정보들(requestedScopes)을 담아 ASAuthorizationController를 띄울 준비를 하고,
밑에서 작성할 presentationAnchor(for:) 메소드를 통해 요청할 ViewController의 정보를 받아 띄우게 된다.

🗝 delegate / presentationContextProvider
저 위 코드블럭만 붙여넣기 했다면 오류가 바로 마중을 나왔을 것이다.
Delegate를 상속 받았다면 필수 메소드를 구현해주어야겠지?
extension LoginViewController: ASAuthorizationControllerDelegate, ASAuthorizationControllerPresentationContextProviding{
func presentationAnchor(for controller: ASAuthorizationController) -> ASPresentationAnchor {
return self.view.window!
}
func authorizationController(controller: ASAuthorizationController, didCompleteWithAuthorization authorization: ASAuthorization) {
//로그인 성공
switch authorization.credential {
case let appleIDCredential as ASAuthorizationAppleIDCredential:
// You can create an account in your system.
let userIdentifier = appleIDCredential.user
let fullName = appleIDCredential.fullName
let email = appleIDCredential.email
if let authorizationCode = appleIDCredential.authorizationCode,
let identityToken = appleIDCredential.identityToken,
let authCodeString = String(data: authorizationCode, encoding: .utf8),
let identifyTokenString = String(data: identityToken, encoding: .utf8) {
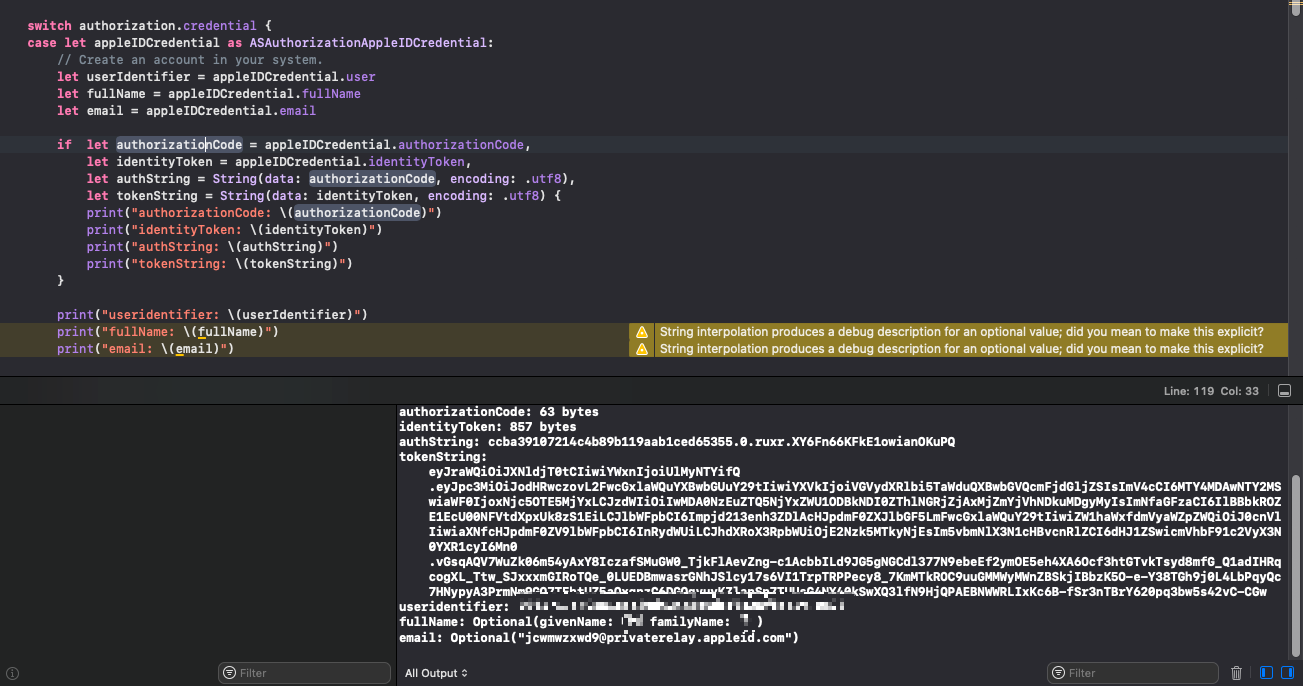
print("authorizationCode: \(authorizationCode)")
print("identityToken: \(identityToken)")
print("authCodeString: \(authCodeString)")
print("identifyTokenString: \(identifyTokenString)")
}
print("useridentifier: \(userIdentifier)")
print("fullName: \(fullName)")
print("email: \(email)")
//Move to MainPage
//let validVC = SignValidViewController()
//validVC.modalPresentationStyle = .fullScreen
//present(validVC, animated: true, completion: nil)
case let passwordCredential as ASPasswordCredential:
// Sign in using an existing iCloud Keychain credential.
let username = passwordCredential.user
let password = passwordCredential.password
print("username: \(username)")
print("password: \(password)")
default:
break
}
}
func authorizationController(controller: ASAuthorizationController, didCompleteWithError error: Error) {
// 로그인 실패(유저의 취소도 포함)
print("login failed - \(error.localizedDescription)")
}
}
didCompleteWithAuthorization, didCompleteWithError라는 두 가지 메소드가 존재한다는 것을 알 수 있다.
🗝 func authorizationController(:_ didCompleteWithAuthorization: )
authorization.credential :
authorization은 controller로부터 받은 인증 성공 정보에 대한 캡슐화 객체이다.
credential은 그 중 포함된 프로퍼티로. 인증 성공이 된 후에 사용자에게 제공되는 정보들을 갖고 있다.
ASAuthorizationAppleIDCredential:
Apple ID 인증을 성공적으로 마쳤을 때 결과값으로 돌아오는 credential.
FaceID, Apple ID의 password로 인증 시 돌아오는 값이다.
5가지 값을 활용할 수 있다.
- .user : user에 대한 고유 식별자 (Apple ID의 고유 값이므로, 호출 시마다 변하지 않는 값.)
- .fullName : user의 이름
- .email : user의 이메일
("나의 이메일 가리기" 선택 시, ~@privaterelay.appleid.com 포맷의 임의 주소를 받게 된다. 호출 시마다 바뀐다.)
- .authorizationCode : 앱이 서버와 상호 작용하는 데 사용하는 토큰.
- .identityToken : 사용자에 대한 정보를 앱에 안전하게 전달하는 JWT.
직접적으로 쓰이는 정보들은 .user, .fullName, .email이 될 것이다.
.authorizationCode와 .identityToken은
Generate and valid tokens, revoke tokens에서 사용된다.
ASPasswordCredential :
그냥 password credential라고 설명이 되어 있다.
알아보니 iCloud의 비밀번호를 연동할 때 결과값으로 돌아오는 credential이라고 한다.
이 예제에서는 사용하지 않을 것이다.
didCompleteWithAuthorization, didCompleteWithError 메소드와 Credential을 잘 활용하면
User의 Apple ID와 관련된 값을 받아올 수 있고, 이를 통해 사용자들을 정확히 특정해낼 수 있을 것이다.
⌘ 이게 다야?
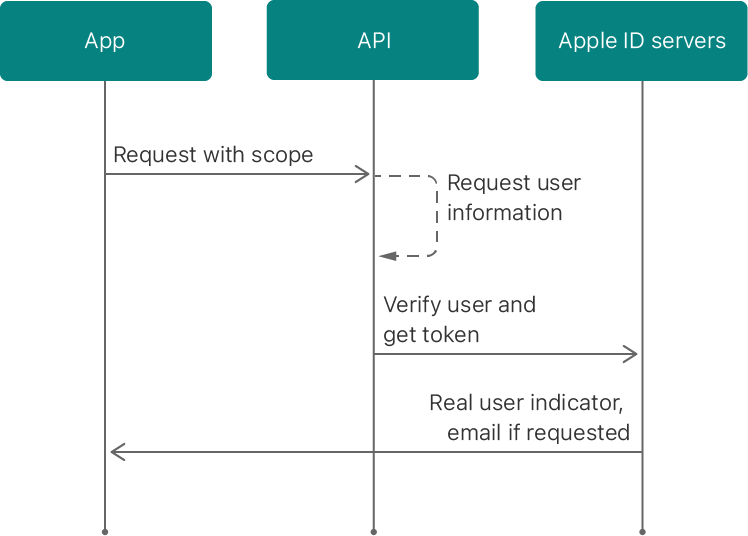

허나 결론적으로는 미완성 상태이다. 현재 상황은 User로부터 Apple ID와 관련된 정보를 받아오는 것에 대한 요청을 하고,
이를 허가받아 정보를 받아오는 것에 그친 것이다. 우리는 API에 token을 전송하거나 Request를 보낸 적이 없다.
2부에서 여지껏 진행해왔던 로직에서는 우리가 1부에서 공부했던 그 어떤 인증 방법도 찾아볼 수가 없다.
고로, 여기서 다음 화면으로 이동하기 전에 토큰의 유효성에 대한 검사 및 발급이 이루어져야 적절한 로그인/회원가입 절차가 될 것이다.
만약 최초 로그인이거나 토큰이 존재하지 않는다면, 토큰을 생성 후 발급해야 한다.
다만 이 포스팅의 프로젝트에는 API가 존재하지 않으므로 제외한 것이다.
이 과정을 건너 뛴다면, 당연히 해커에게 개인정보를 꽁으로 가져다 바치는 셈이라고 할 수 있으니 명심하자.
(토큰의 추가 및 유효성 검사에 대한 방법은 3부 포스팅에서 다루어볼 예정이다.)
📂 getCredentialState - 자동 로그인
ASAuthoriazationAppleIDProvider의 .getCredentialState를 사용하면, 현재의 credentialState를 판단할 수 있다.
확인 과정에서 UserID값을 필요로 하는 것 같으니, UserDefaults나 Local DB 등 따로 저장해두고 사용한다면 좋을 것이다.
- .authorized : 해당 ID에 대해 인증이 완료되어있는 상태
- .revoked : 해당 ID의 인증이 취소된 상태
- .notFound : 해당 ID의 인증여부를 알 수 없는 상태(최초 진입 등)
위 값들에 따라 분기를 나누어 활용하면 된다.
AppDelegate나 SceneDelegate에서 적절한 곳에 구현해주면 된다.
 let appleIDProvider = ASAuthorizationAppleIDProvider()
 appleIDProvider.getCredentialState(forUserID: "/*user의 고유 ID값(xxxxx.xxxxxxxxxx.xxxx)*/") { (credentialState, error) in
     switch credentialState {
         case .authorized:
            print("authorized")
            // The Apple ID credential is valid.
            DispatchQueue.main.async {
              //authorized된 상태이므로 바로 로그인 완료 화면으로 이동
              self.window?.rootViewController = SignValidViewController()
            }
         case .revoked:
            print("revoked")
         case .notFound:
            // The Apple ID credential is either revoked or was not found, so show the sign-in UI.
            print("notFound")

         default:
             break
     }
 }
AppDelegate의 didFinishLaunchingWithOptions에서 구현해 놓는 것이 일반적이겠지만,
사용 도중 revoke가 될 것을 고려한다면, SceneDelegate의 sceneDidBecomeActive() 에도 구현해놓는 것이 좋을 것이다.

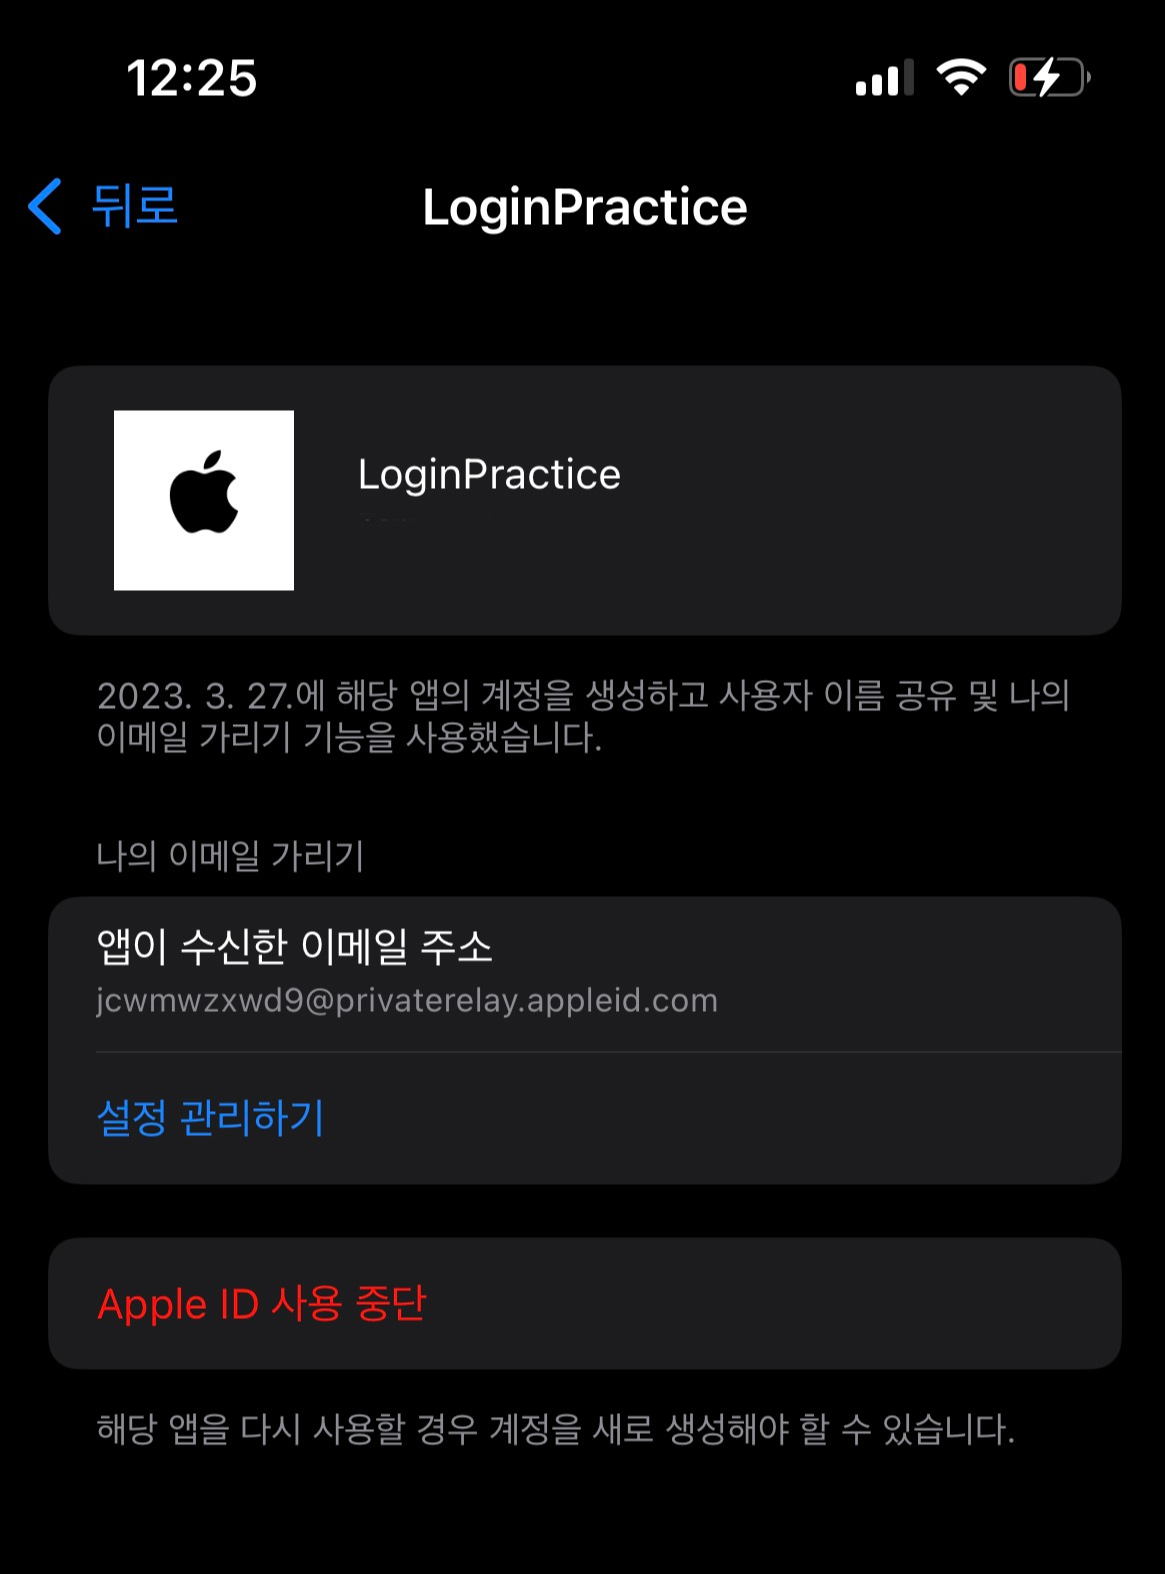
한번 authorized 된 계정에 대해, revoke하는 방법은 아래와 같다.
1) User가 직접 자신의 authorization에 대해 revoke
Device의 "설정" 앱 → 암호 및 보안 → "Apple ID를 사용하는 앱" → 자신이 취소할 앱 선택 후 Apple ID 사용 중단 터치
2) 코드 상에서 User의 authorization에 대해 revoke
3부에서 후술할 "revoke token"으로도 가능하다.
다음 포스팅에서는 Generate and validate token, Revoke token(회원탈퇴)에 대해서 알아볼 것이다 !
📌 마치며
트릴로지 포스팅을 작성하고 있는데
흐름도 깨지지 않는 것 같아서 깊게 공부하는 느낌이고,
어서 빨리 이 3부작을 끝내고 싶다는 생각도 같이 들고 있다. ^^
오류 및 지적사항은 댓글로 남겨주시면 감사하겠습니다!
참고 :
'공부 노트(Swift)' 카테고리의 다른 글
| [Swift] class와 structure의 차이점 (0) | 2023.05.20 |
|---|---|
| [Swift] Apple Login 구현하기 [3/3] - Apple로 Login 탈퇴하기(revoke Token) (4) | 2023.04.26 |
| [Swift] Apple Login 구현하기 [1/3] - 기본 개념 (1) | 2023.03.20 |
| [Swift] Singleton pattern(싱글톤 패턴) (0) | 2023.03.06 |
| [Swift] UIColor/CGColor, CGSize/CGPoint/CGRect, frame/bounds (0) | 2023.02.13 |

