
Weekoding
[Swift] Apple Login 구현하기 [3/3] - Apple로 Login 탈퇴하기(revoke Token) 본문
[Swift] Apple Login 구현하기 [3/3] - Apple로 Login 탈퇴하기(revoke Token)
Weekoding 2023. 4. 26. 22:37[Swift] Apple Login 구현하기 [2/3] - Apple로 Login 구현하기
[Swift] Apple Login 구현하기 [1/3] - 기본 개념 이번에 "Sign in with Apple"를 구현할 일이 있었는데, 생각보다 애를 먹었다. 정확히는 revoke token부분이 Login with Kakao ID와는 다르게 엄~청 어려웠다. 다음번엔
weekoding.tistory.com
지난 포스팅에서는 API로 Token을 인증받지 않은 채(팥 없는 붕어빵 격이지만..) 로그인 / 자동로그인 까지 구현해 보았다.
이번에는 Generate and validate token, Revoke token에 대해 알아보고, 이를 토대로 회원 탈퇴까지 구현해 볼 것이다.
여기서 난이도가 상승하는데, 타사 SNS Login API는 메소드 호출만으로 간단히 토큰을 발급/무효 해주는데 반면,
Apple Login은 여러 값들을 구해서 request를 보내주어야 한다.
3부 포스팅으로 구성한 예제 기준으로, 'Generate and validate token' 부분을 통해 토큰을 발급받아야지만 Revoke token이 가능하다.
존재하지도 않은 token을 revoke 할 수는 없으니 말이다.
📂 Generate and validate token
Validate an authorization grant code delivered to your app to obtain tokens, or validate an existing refresh token.
: 토큰을 획득하기 위해 앱에 전달된 권한 부여 코드(authorization grant code)를 확인하거나, 존재하는 refresh token을 확인한다.
위 과정을 진행하기 위해선, Appleid API로 request를 보내야 한다. 아래 사이트에 어떤 값들을 담아 보내야 할지 상세히 나와 있다.

URL : https://appleid.apple.com/auth/token
Method : POST
Header content-type : application/x-www-form-urlencoded
Parameters : client_id, client_secret, code, grant_type
- client_id : 앱의 Bundle ID
- client_secret : JWT(아래 내용 참고!)
- code : The authorization code(2부의 Apple 로그인 과정에서 발급받은 코드)
- grant_type : "autorization_code"
client_id(Bundle ID)는 찾기 쉽고,
code는 2부에서 다루었던 내용이다.
// [2부 글의 코드 중 일부]
// authorizationCode가 바로 authorization code를 갖고 있는 변수이다.
if  let authorizationCode = appleIDCredential.authorizationCode{ ••• }
+) 한번 발급된 authorizationCode는 1번만 사용될 수 있으며 5분간 유효하다. 사용했거나 시간 초과 시 한번 더 호출받아야 한다.
grant_type은 고정값("autorization_code")이다.
client_secret만 어떻게 잘 처리해주면 되겠다.
👤 client_secret 생성하기
JSON Web Token (JWT) is an open-standard (RFC 7519) that defines a way to transmit information securely.
Sign in with Apple requires JWTs to authorize each validation request.
: JWT는 안전하게 정보를 전송할 수 있는 open-standard(RFC 7519)이다.
Sign in with Apple은 각각의 요청 시에 JWT를 필요로 한다.
client_secret이라는 이름을 갖고 있지만, 정체는 JWT라는 것이다. 따라서 본래 이를 생성하는 것은 백엔드에서 이루어져야 할 것이다.
지금은 그러한 서버를 만들 능력이 없으니.. 오픈 소스 라이브러리를 이용하여, 내부에서 JWT를 발급해 보도록 하겠다.
SwiftJWT이라는 라이브러리를 사용했다.
(보통은 사용할 일이 없을 것이다. Client단에서의 발급은 Token 사용의 의미를 잃을 뿐 아니라, 보안상 문제점이 발생할 수도 있다.)
https://github.com/Kitura/Swift-JWT
GitHub - Kitura/Swift-JWT: JSON Web Tokens in Swift
JSON Web Tokens in Swift. Contribute to Kitura/Swift-JWT development by creating an account on GitHub.
github.com
client_secret(JWT)을 생성하기 위해서 다음 값들이 필요하다.
- alg : "ES256" (암호화 방식 중 하나라고 한다.)
- kid : 앱에 등록된 sign in with apple의 Key ID
- iss : 자신의 Team ID
- iat : 현재 일자
- exp : 만료 일자
- aud : "https://appleid.apple.com/"
- sub : 앱의 Bundle ID
kid와 iss 같은 경우는 https://developer.apple.com/account 사이트에서,
Certificates, Identifiers & Profiles → Keys → 자신이 Sign in with Apple을 사용하고 있는 프로젝트에서 확인할 수 있다.
(아마 없을테니 한번 추가해 보자.)
1. App ID를 골라준다. 이때, 2부에서 'Identifiers'를 정확하게 잘 추가해주었다면 drop box에 등록했던 ID가 보일 것이다.

2. Sign in with Apple을 찾고, Register 후 뒤로 돌아간다.

3. Key Name을 입력하고, Continue로 계속 진행한다.

4. key 파일을 다운받아 잘 보관한다.( ! 주의 ! - 잃어버리면 재발급 X)
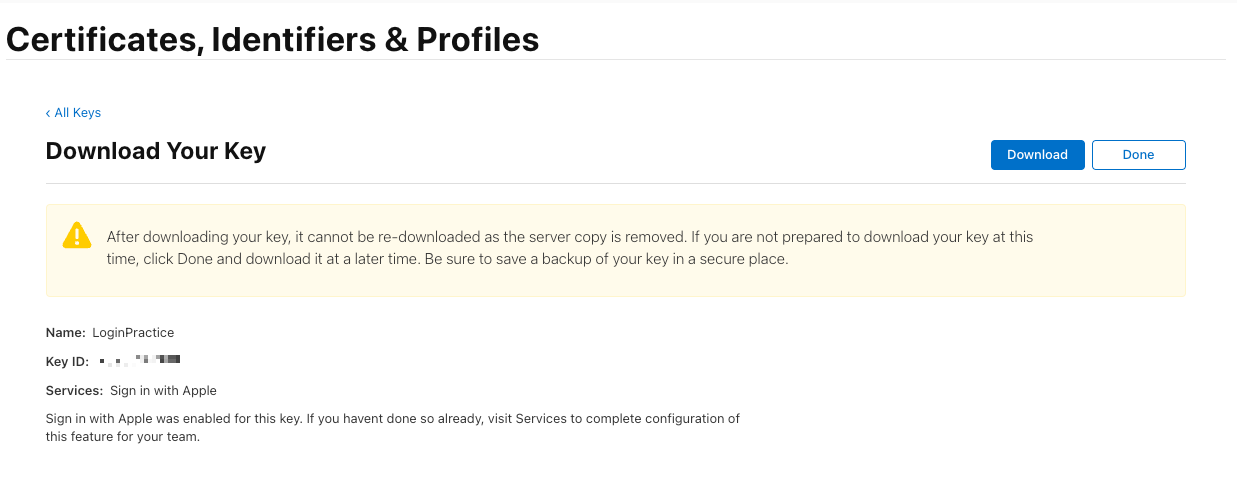
5. Key ID와 Team ID를 한눈에 확인할 수 있다.

자 이제 SwiftJWT 와 통신을 위한 Alamofire 라이브러리를 S.P.M 또는 Cocoapod을 이용해 추가하고~


본격적으로 SwiftJWT를 통해 JWT를 발급받는 코드를 들여다 보자.
import SwiftJWT
import Alamofire

// ...(중략)

extension SignValidViewController{
    //client_secret
    func makeJWT() -> String{
        let myHeader = Header(kid: "Your_Apple_Key_ID") //sign in with
        struct MyClaims: Claims {
            let iss: String
            let iat: Int
            let exp: Int
            let aud: String
            let sub: String
        }

        let nowDate = Date()
        var dateComponent = DateComponents()
        dateComponent.month = 6
        let sixDate = Calendar.current.date(byAdding: dateComponent, to: nowDate) ?? Date()
        let iat = Int(Date().timeIntervalSince1970)
        let exp = iat + 3600
        let myClaims = MyClaims(iss: "Your_Apple_Team_ID",
                                iat: iat,
                                exp: exp,
                                aud: "https://appleid.apple.com",
                                sub: "Your_App_Bundle_ID")

        var myJWT = JWT(header: myHeader, claims: myClaims)

		//JWT 발급을 요청값의 암호화 과정에서 다운받아두었던 Key File이 필요하다.(.p8 파일)
        guard let url = Bundle.main.url(forResource: "YOUR_DOWNLOADED_KEYFILE_NAME", withExtension: "p8") else{
            return ""
        }
        let privateKey: Data = try! Data(contentsOf: url, options: .alwaysMapped)

        let jwtSigner = JWTSigner.es256(privateKey: privateKey)
        let signedJWT = try! myJWT.sign(using: jwtSigner)

        print("🗝 singedJWT - \(signedJWT)")
        return signedJWT
    }
}
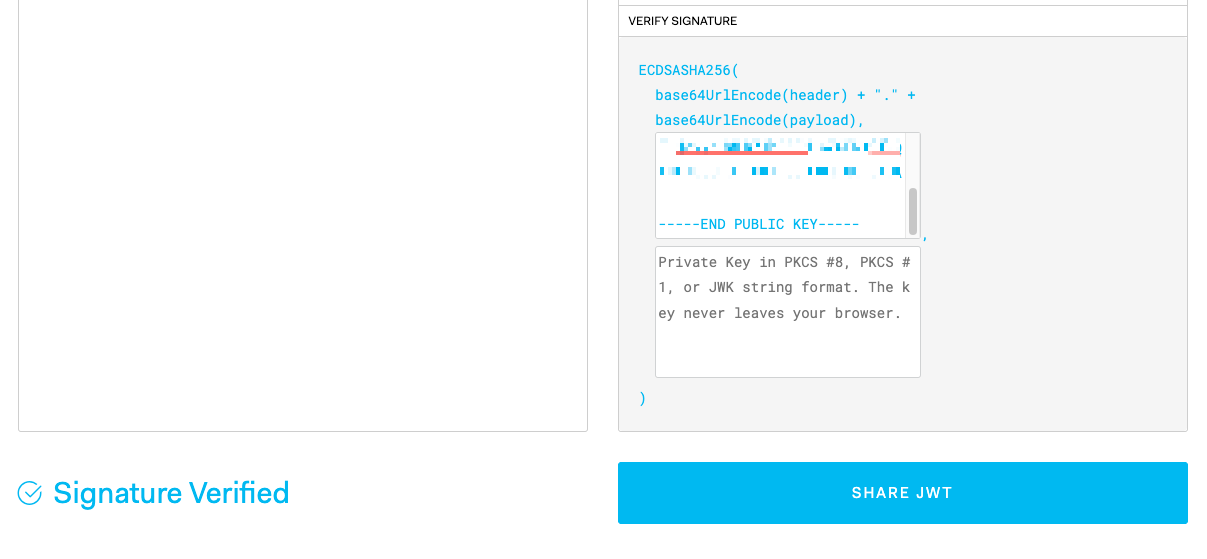
참고로, 이 JWT가 정확한 값인지 확인할 수 있는 웹사이트가 있다.
JWT.IO
JSON Web Tokens are an open, industry standard RFC 7519 method for representing claims securely between two parties.
jwt.io
아래 사이트에 사용법도 자세히 나와 있다.
https://fluffy.es/how-to-solve-invalid_client-error-in-sign-in-with-apple/#payload
링크 내용을 설명하자면, 다음과 같다.

1. 출력된 JWT값(signedJWT)을 'Encoded'에 붙여넣는다.
정상적인 값이면 'Decoded'에 내가 JWT를 만들 때 넣었던 key-value가 표시된다. 자신의 입력 값이 잘못되었는지 확인할 수 있다.
2. Public Key 파일을 만들어 준다(원래는 Private Key이다)

아마 Apple Developer에서 다운받은 Key는 다음과 같은 모양일 것이다.
-----Begin Private Key------
(codes...)
-----End Private Key------
Terminal을 켠 후, 파일이 설치된 위치로 가서 해당 명령을 실행해 주면 Private Key를 만들 수 있다.
openssl ec -in AuthKey_123ABC456.p8 -pubout -out AuthKey_123ABC456_public.p8
Private 키워드가 Public으로 바뀌고, 안의 암호화된 내용도 조금 달라졌을 것이다.
-----Begin Public Key------
(codes...)
-----End Public Key------
3. 해당 Public Key를 통째로 긁어서 Verify Signature에다가 긁어보면 JWT가 Verified가 되었는지 알 수 있다 !
(Private Key로는 Verifiy 여부를 확인할 수 없다)
JWT 발급 및 검증과정까지 마쳤다.
자 이제 재료가 다 모였다.
발급받은 JWT를 포함하여 token을 Generate 해보자.
(UserDefaults를 활용하여 Authorization code와 client_secret을 저장하였다.)
    //client_refreshToken
    func getAppleRefreshToken(code: String, completionHandler: @escaping (String?) -> Void) {

        guard let secret = UserDefaults.standard.string(forKey: "AppleClientSecret") else {return}

        let url = "https://appleid.apple.com/auth/token?client_id=YOUR_BUNDLE_ID&client_secret=\(secret)&code=\(code)&grant_type=authorization_code"
        let header: HTTPHeaders = ["Content-Type": "application/x-www-form-urlencoded"]

        print("🗝 clientSecret - \(UserDefaults.standard.string(forKey: "AppleClientSecret"))")
        print("🗝 authCode - \(code)")

        let a = AF.request(url, method: .post, encoding: JSONEncoding.default, headers: header)
        .validate(statusCode: 200..<500)
        .responseData { response in
            print("🗝 response - \(response.description)")

            switch response.result {
            case .success(let output):
//                print("🗝 ouput - \(output)")
                let decoder = JSONDecoder()
                if let decodedData = try? decoder.decode(AppleTokenResponse.self, from: output){
//                    print("🗝 output2 - \(decodedData.refresh_token)")

                    if decodedData.refresh_token == nil{
                        let dialog = UIAlertController(title: "error", message: "토큰 생성 실패", preferredStyle: .alert)
                        let okayAction = UIAlertAction(title: "확인", style: .default, handler: {_ in
                            self.dismiss(animated: true)
                        })
                        dialog.addAction(okayAction)
                        self.present(dialog, animated: true, completion: nil)
                    }else{
                        completionHandler(decodedData.refresh_token)
                    }
                }

            case .failure(_):
                //로그아웃 후 재로그인하여
                print("애플 토큰 발급 실패 - \(response.error.debugDescription)")
                let dialog = UIAlertController(title: "error", message: "토큰 생성 실패", preferredStyle: .alert)
                let okayAction = UIAlertAction(title: "확인", style: .default, handler: {_ in
                    self.dismiss(animated: true)
                })
                dialog.addAction(okayAction)
                self.present(dialog, animated: true, completion: nil)
            }
        }
    }
실행해보면 log를 통해 생성한 token이 출력됨을 확인할 수 있다.
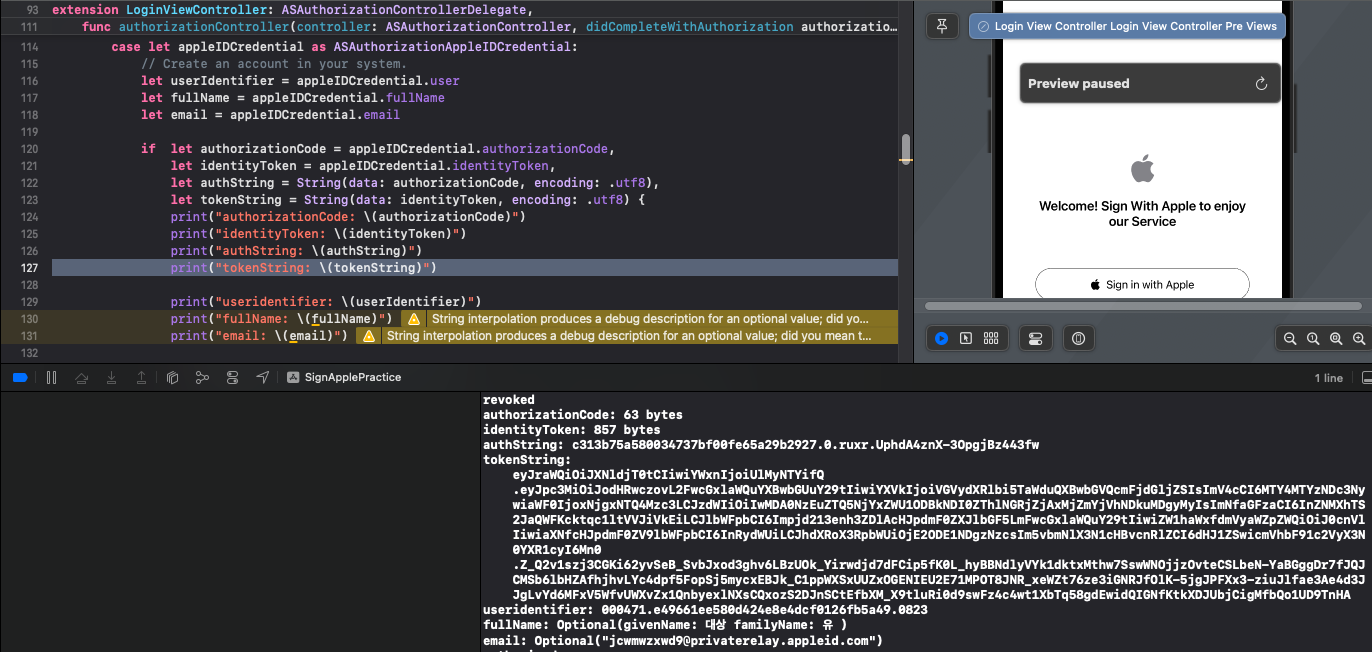
출력된 값들을 이용하면 PostMan을 통해서도 확인해 볼 수 있다.(이중 검증을 하거나 encoding 실패 등의 상황에 유용하다)
특이한 점은, POST 방식임에도 불구하고 Params로 요청해야 정상적으로 잘 발급이 되었다.
📂 Revoke token
Invalidate the tokens and associated user authorizations for a user
when they are no longer associated with your app.
: 사용자가 앱과 더 이상 연결되어 있지 않은 경우에, 사용자에 대한 토큰 및 관련된 사용자 권한을 무효화한다.
Revoke token 기능이 구현되어야 비로소 회원탈퇴기능이 완성된다. (구현되어 있지 않으면 앱 스토어 심사에서도 리젝된다)
서버의 DB단에서 회원 데이터만 삭제시키는 것이 전부가 아니라는 의미이다. Apple ID와의 연결도 끊어야 한다.
따라서 Apple은 탈퇴 시 안전하게 Apple Login시 사용되는 token을 revoke하라고 요구한다.
revoke token이 완료되면, 포스팅 2부에서 "Apple ID 사용 중단"을 누른 것과 동일한 기능으로 ID의 연결이 끊기게 된다.
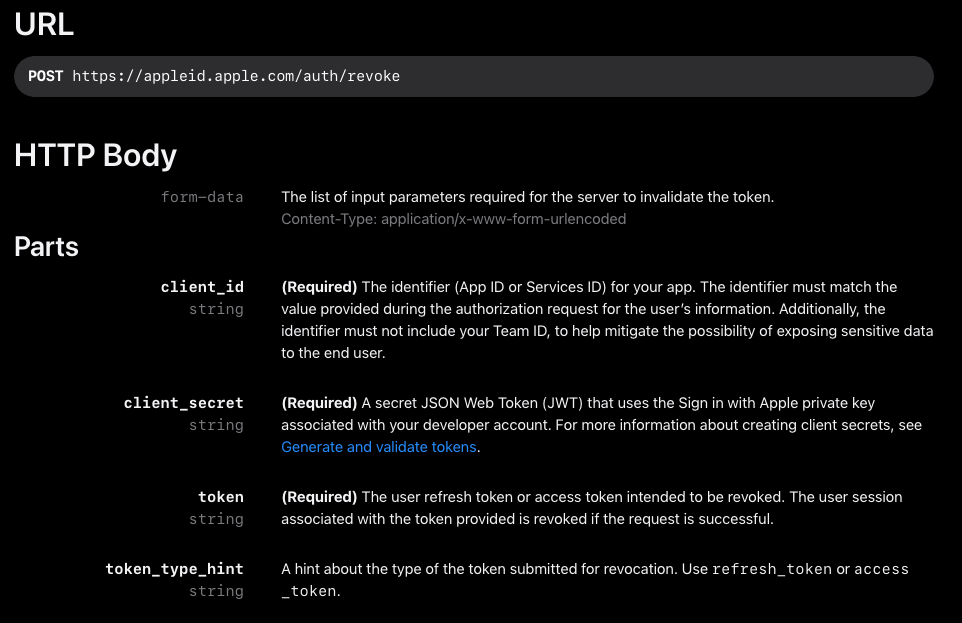
URL : https://appleid.apple.com/auth/revoke
Method : POST
Header content-type : application/x-www-form-urlencoded
Parameters : client_id, client_secret, token
- client_id : 앱의 Bundle ID
- client_secret : JWT(아래 내용 참고)
- token : The authorization code(2부의 Apple 로그인 과정에서 발급받은 코드)
재료는 아까 다 모았으니 바로 코드를 보도록 하겠다.
 func revokeAppleToken(clientSecret: String, token: String, completionHandler: @escaping () -> Void) {
        let url = "https://appleid.apple.com/auth/revoke?client_id=YOUR_BUNDLE_ID&client_secret=\(clientSecret)&token=\(token)&token_type_hint=refresh_token"
        let header: HTTPHeaders = ["Content-Type": "application/x-www-form-urlencoded"]

        AF.request(url,
                   method: .post,
                   headers: header)
        .validate(statusCode: 200..<600)
        .responseData { response in
            guard let statusCode = response.response?.statusCode else { return }
            if statusCode == 200 {
                print("애플 토큰 삭제 성공!")
                completionHandler()
            }
        }
    }
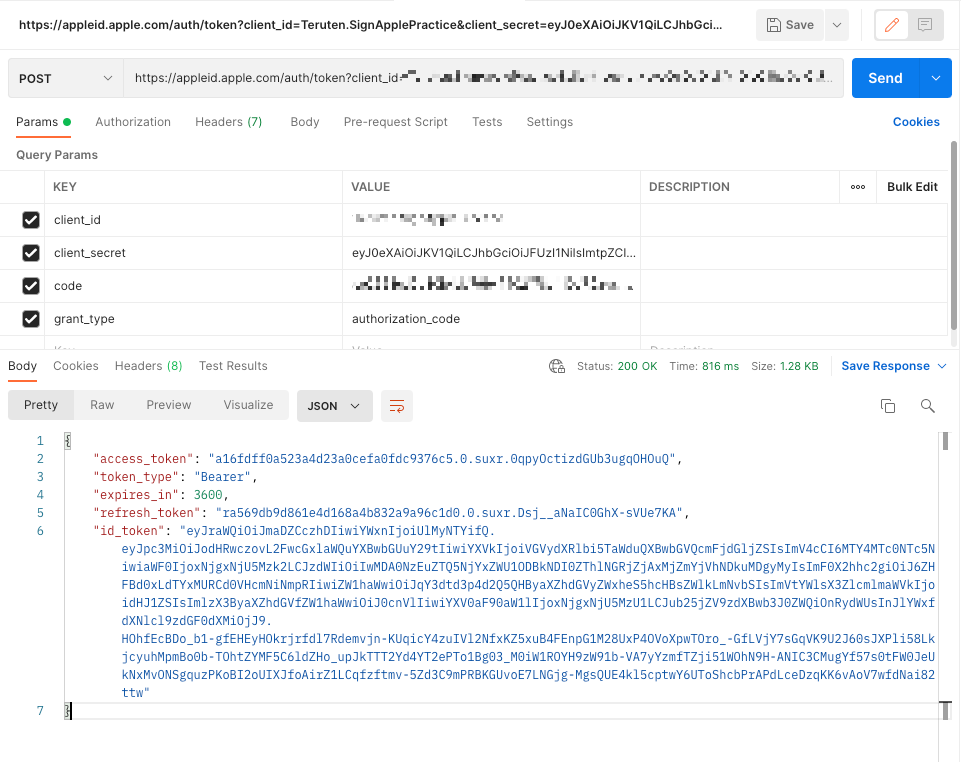
정상적으로 revoke가 된 경우, 아래와 같이 Log를 확인해볼 수 있다.

마찬가지로 PostMan에서도 똑같이 확인해볼 수 있다.

[ 버튼 클릭 시 최종 이벤트 처리 메소드 코드 ]
 @objc func tabbedWithdrawalBtn(){
        let jwtString = self.makeJWT()

        guard let taCode = UserDefaults.standard.string(forKey: "theAuthorizationCode") else { return }

        self.getAppleRefreshToken(code: taCode, completionHandler: { output in

            //                        if let clientSecret = UserDefaults.standard.string(forKey: "AppleClientSecret"),
            //                           let refreshToken = UserDefaults.standard.string(forKey: "AppleRefreshToken") {
            let clientSecret = jwtString
            if let refreshToken = output{
                print("Client_Secret - \(clientSecret)")
                print("refresh_token - \(refreshToken)")

                // api 통신
                self.revokeAppleToken(clientSecret: clientSecret, token: refreshToken) {
                    print("Apple revoke token Success")

                }
            }else{
                let dialog = UIAlertController(title: "error", message: "회원탈퇴 실패", preferredStyle: .alert)
                let okayAction = UIAlertAction(title: "확인", style: .default, handler: {_ in
                    self.dismiss(animated: true)
                })
                dialog.addAction(okayAction)
                self.present(dialog, animated: true, completion: nil)
            }
        })
    }
실제로는 활용할 수 없는 처리방식이겠지만,
Apple Login의 회원탈퇴(revoke token) 구현에는 어떤 것들이 필요하고, 어떤 식으로 진행되는지 알아볼 수 있는 예제였다.
✅ 정리
- Sign in with Apple ID는 회원 탈퇴시 토큰이 필요하다(revoke token)
- generate and valide token 시, .p8 인증키로 암호화된 request를 통해 발급받은 JWT(secret_client)가 필요하다.
- 발급받은 refresh token을 통해 revoke token을 request가 success(code 200)한다면 Apple ID의 계정 연동이 해제된다.
extension SignValidViewController{
    // MARK: - 애플 엑세스 토큰 발급 응답 모델
    struct AppleTokenResponse: Codable {
        var access_token: String?
        var token_type: String?
        var expires_in: Int?
        var refresh_token: String?
        var id_token: String?

        enum CodingKeys: String, CodingKey {
            case refresh_token = "refresh_token"
        }
    }


    //client_secret
    func makeJWT() -> String{
        let myHeader = Header(kid: "X598C84398") //sign in with apple key ID

        // MARK: - client_secret(JWT) 발급 응답 모델
        struct MyClaims: Claims {
            let iss: String
            let iat: Int
            let exp: Int
            let aud: String
            let sub: String
        }

        let nowDate = Date()
        var dateComponent = DateComponents()
        dateComponent.month = 6
        let sixDate = Calendar.current.date(byAdding: dateComponent, to: nowDate) ?? Date()
        let iat = Int(Date().timeIntervalSince1970)
        let exp = iat + 3600
        let myClaims = MyClaims(iss: "YOUR_TEAM_ID",
                                iat: iat,
                                exp: exp,
                                aud: "https://appleid.apple.com",
                                sub: "YOUR_BUNDLE_ID")

        var myJWT = JWT(header: myHeader, claims: myClaims)

        guard let url = Bundle.main.url(forResource: "AuthKey_AABBCC1233", withExtension: "p8") else{
            return ""
        }
        let privateKey: Data = try! Data(contentsOf: url, options: .alwaysMapped)

        let jwtSigner = JWTSigner.es256(privateKey: privateKey)
        let signedJWT = try! myJWT.sign(using: jwtSigner)
        UserDefaults.standard.set(signedJWT, forKey: "AppleClientSecret")
        print("🗝 singedJWT - \(signedJWT)")
        return signedJWT
    }


    //client_refreshToken
    func getAppleRefreshToken(code: String, completionHandler: @escaping (String?) -> Void) {

        guard let secret = UserDefaults.standard.string(forKey: "AppleClientSecret") else {return}

        let url = "https://appleid.apple.com/auth/token?client_id=YOUR_BUNDLE_ID&client_secret=\(secret)&code=\(code)&grant_type=authorization_code"
        let header: HTTPHeaders = ["Content-Type": "application/x-www-form-urlencoded"]

        print("🗝 clientSecret - \(UserDefaults.standard.string(forKey: "AppleClientSecret"))")
        print("🗝 authCode - \(code)")

        let a = AF.request(url, method: .post, encoding: JSONEncoding.default, headers: header)
        .validate(statusCode: 200..<500)
        .responseData { response in
            print("🗝 response - \(response.description)")

            switch response.result {
            case .success(let output):
//                print("🗝 ouput - \(output)")
                let decoder = JSONDecoder()
                if let decodedData = try? decoder.decode(AppleTokenResponse.self, from: output){
//                    print("🗝 ouput2 - \(decodedData.refresh_token)")

                    if decodedData.refresh_token == nil{
                        let dialog = UIAlertController(title: "error", message: "회원탈퇴 실패", preferredStyle: .alert)
                        let okayAction = UIAlertAction(title: "확인", style: .default, handler: {_ in
                            self.dismiss(animated: true)
                        })
                        dialog.addAction(okayAction)
                        self.present(dialog, animated: true, completion: nil)
                    }else{
                        completionHandler(decodedData.refresh_token)
                    }
                }

            case .failure(_):
                //로그아웃 후 재로그인하여
                print("애플 토큰 발급 실패 - \(response.error.debugDescription)")
                let dialog = UIAlertController(title: "error", message: "회원탈퇴 실패", preferredStyle: .alert)
                let okayAction = UIAlertAction(title: "확인", style: .default, handler: {_ in
                    self.dismiss(animated: true)
                })
                dialog.addAction(okayAction)
                self.present(dialog, animated: true, completion: nil)
            }
        }
    }


    func revokeAppleToken(clientSecret: String, token: String, completionHandler: @escaping () -> Void) {
        let url = "https://appleid.apple.com/auth/revoke?client_id=YOUR_BUNDLE_ID&client_secret=\(clientSecret)&token=\(token)&token_type_hint=refresh_token"
        let header: HTTPHeaders = ["Content-Type": "application/x-www-form-urlencoded"]

        AF.request(url,
                   method: .post,
                   headers: header)
        .validate(statusCode: 200..<600)
        .responseData { response in
            guard let statusCode = response.response?.statusCode else { return }
            if statusCode == 200 {
                print("애플 토큰 삭제 성공!")
                completionHandler()
            }
        }
    }
}
📌 마치며
내가 정말 애먹었던 부분!!! 사실 이 부분을 위해서 포스팅을 시작했다고 해도 과언이 아니다.
Sign in with Apple Login을 구현하기 위해서 너무 많은 값들이 필요했고, request 및 response처리까지 해주어야 했다.
또 한편으로는 하나하나 갖추어 가는 재미가 있었다. (인피니티 스톤을 모으던 타노스도 이런 기분이었을까?)
서버 및 백엔드를 통해 토큰을 생성하고 검증하는 과정들도 함께 연습이 되었다면 좋았을텐데, 그러지 못한 점은 아쉽다.
오류 및 지적사항은 댓글로 남겨주시면 감사하겠습니다!
참고 :
https://developer.apple.com/documentation/sign_in_with_apple/generate_and_validate_tokens/
'공부 노트(Swift)' 카테고리의 다른 글
| [Swift] extension(확장)과 inheritance(상속) (0) | 2023.05.24 |
|---|---|
| [Swift] class와 structure의 차이점 (0) | 2023.05.20 |
| [Swift] Apple Login 구현하기 [2/3] - Apple로 Login 구현하기 (2) | 2023.04.01 |
| [Swift] Apple Login 구현하기 [1/3] - 기본 개념 (1) | 2023.03.20 |
| [Swift] Singleton pattern(싱글톤 패턴) (0) | 2023.03.06 |


